Securing a power rack to the floor is critical for safety and stability during workouts. According to a report by the Fitness Equipment Manufacturers Association, over 30% of workout injuries are related to improperly installed equipment. Ensuring that your power rack is firmly bolted down can drastically reduce this risk. As fitness expert Lisa D’Amato points out, "A secure power rack not only protects users but enhances their overall workout experience."
When addressing the question, "How to bolt a power rack to the floor?", considerations such as floor material, bolt size, and weight distribution come into play. Each installation is unique and requires careful planning. Some gym enthusiasts overlook the importance of a secure setup, leading to potential accidents. A reliable installation not only boosts confidence but allows users to perform heavy lifts safely.
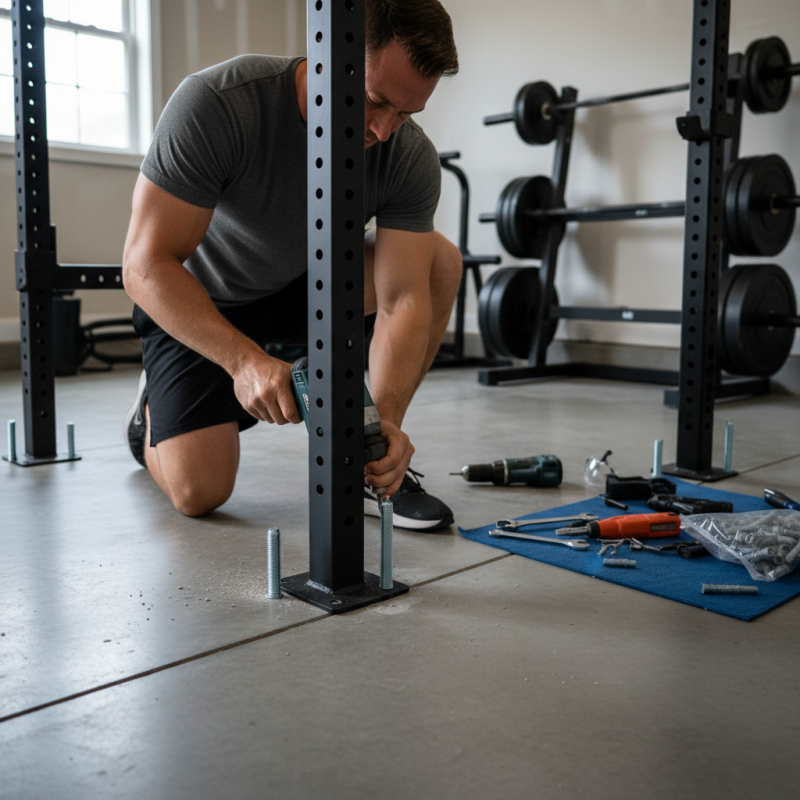
Proper techniques and tools are essential for bolting a power rack securely. Experts agree that the right approach can make all the difference. In this guide, we will explore effective strategies, including expert advice and best practices to ensure your power rack remains steadfast during even the most intense workouts.
When choosing the right location for your power rack, consider both safety and functionality. Research shows that 70% of gym injuries stem from improper equipment placement. Hence, the power rack should be located in a spacious area that allows for easy access all around. A minimum of three feet of clearance on all sides is recommended. This ensures you have room to maneuver while lifting weights.
Lighting is another crucial factor. A well-lit area can enhance your workout experience. Reports indicate that users in well-lit environments are 20% more likely to engage in their fitness routines consistently. Avoid corners or dimly lit spaces that can cause accidents or hinder visibility.
Additionally, consider the flooring type. Concrete floors are sturdy but can be unforgiving. If possible, add protective mats to minimize impact and protect your equipment. Reflect on how these elements interconnect. The chosen location should not only support safety but also motivate you to maintain a regular workout schedule. If the area feels cramped or uninviting, it may discourage usage over time.
When bolting a power rack to the floor, having the right tools and materials is essential for safety and stability. A recent industry report highlighted that approximately 30% of gym goers experience injuries due to improper equipment setup. This makes it crucial to ensure that your power rack is securely anchored.
To begin, you will need specific tools. A concrete drill is critical. Choose one with a hammer function, designed for drilling into hard surfaces. You’ll also need concrete bolts or anchors, which provide the necessary support. A level is essential to ensure your rack sits upright. A socket wrench will help tighten the bolts, ensuring a secure fit.
As for materials, quality matters. Use high-grade concrete anchors capable of withstanding heavy loads. The load capacity of your bolts should exceed the total weight you'll use on the rack, considering both weights and your body weight. An average power rack can support at least 1,000 pounds. However, inadequate attention to installation could lead to failures. Regularly inspect your setup for signs of wear or damage. Your safety depends on it.
This chart represents the recommended weight capacity for bolting a power rack, emphasizing the importance of adequate anchoring based on weight distribution.
Preparing the floor for bolting a power rack is crucial for safety and stability. A well-prepped floor minimizes risks during heavy lifts. Many gym accidents occur due to inadequate equipment anchoring. A study by the National Safety Council indicates that improper equipment placement contributes to 30% of gym-related injuries.
Begin with assessing the floor type. Concrete floors offer the best support. Prepare the area by clearing debris. Use a vacuum to eliminate dust. If the floor is wooden, consider reinforcing it. Wooden floors can flex, leading to instability. One solution is to add plywood beneath the power rack. This enhances load distribution.
Next, mark the bolting positions accurately. Use a level to ensure the power rack is straight. Misalignment can lead to uneven stress, risking injury. Drill holes carefully, ensuring they are sized appropriately for your bolts. Always use quality anchors. Many professionals recommend using expansion bolts for concrete. These provide a reliable hold, especially under heavy loads.
Aligning and securing a power rack correctly is crucial for your safety.
Begin by marking the placement on the floor. Ensure the area is clear. Use a level to check that your rack sits perfectly straight. Misalignment can lead to instability, increasing the risk of accidents during workouts.
When bolting down the rack, select durable anchors. Use appropriate tools to create holes in the floor. Be mindful of the surface type; concrete requires specific drill bits. This part of the process can be tedious, but precision is vital. A slight mistake can compromise the entire setup.
After securing the rack, test its stability. Push against it firmly to assess if it wobbles. Adjust if necessary. Maintaining a stable setup is key for your safety and performance. Remember, it's not just about securing a rack; it's about creating a safe workout environment that you can trust.
Securing a power rack is crucial for safe workouts, but the job doesn't end once it’s bolted down. After installation, checking the integrity of the bolts is essential. This requires routine inspections—perhaps every month—to ensure nothing has loosened over time. A loose bolt can lead to instability, which may result in accidents. Use a torque wrench to confirm proper tightness during these checks.
Beyond the physical checks, keeping the surrounding area clean is vital for safety. Remove any obstacles, such as weights or benches, that could lead to tripping. Always keep the floor dry to prevent slipping. Additionally, consider using mats underneath the rack for extra cushioning. This can enhance stability and provide a clearer boundary for your workout space.
Maintenance is not just about ensuring hardware is intact. Think about the wear and tear of the rack itself. Regularly clean the frame to prevent rust and inspect for any scratches or damage. Addressing these issues promptly can prolong the life of your equipment. Remember, even the best-installed setups can falter if neglected.
: It ensures safety and stability during heavy lifts, minimizing risks and accidents.
Concrete floors are optimal for stability and strength during weight lifting.
Remove debris and use a vacuum to eliminate dust from the floor.
Consider reinforcing it with plywood under the power rack for better load distribution.
Use a level to ensure the power rack is straight and mark positions correctly.
Mistakes can compromise the entire setup, leading to instability and safety risks.
Quality expansion bolts are recommended, especially for securing into concrete.
Give it a firm push to check for wobbling and adjust as necessary.
Appropriate drill bits for the surface type and durable anchors are essential.
Misalignment can lead to uneven stress, increasing the risk of accidents during workouts.
When considering how to bolt a power rack to the floor, it's essential to start by choosing the right location that offers both stability and convenience for your workout needs. This ensures that you have ample space around the rack while maintaining easy access to weights and other equipment. Before beginning the installation, gather the necessary tools and materials to facilitate a smooth process.
The installation involves a step-by-step guide for preparing the floor, which includes cleaning the area and marking bolt positions. Proper alignment is crucial, as it ensures the rack is secure and safe during use. Following this, use the appropriate hardware to fasten the rack to the floor securely. Lastly, implementing safety tips and performing regular maintenance will enhance longevity and performance, making your power rack a stable foundation for your strength training regimen.
GoLive Fitness